Tag Archive: Strokes

  1. Ink Adhesion Part 3: Ink Mixing, Contamination, Blooming and Mold Release Agents

    Comments Off on Ink Adhesion Part 3: Ink Mixing, Contamination, Blooming and Mold Release Agents

    Ink Adhesion Part 3: Ink Mixing, Contamination, Blooming and Mold Release Agents
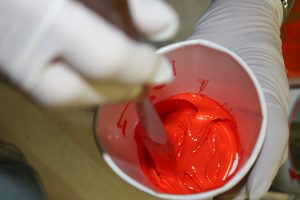
Before printing on any parts there are several factors which are of vital importance: ink mixing, product cleanliness and substrate additives. Regardless of proper ink preparation and chemistry, surface contamination, blooming and mold release agents may all interfere with your ability to achieve satisfactory adhesion.

    The two most important factors that must be addressed when dealing with ink mixing are: How are you mixing the ink? What components are you using? Inks are formulated to be mixed at specific ratios, and any deviation may result in adhesion failure. You must choose the correct ink and mix it to the exact manufacturer specifications. It is a common misconception that adding hardener over manufacturing specifications will allow for better adhesion.

    Surface contamination is a huge factor in whether or not the ink will adhere to any given object. The first reason contamination may occur is because people are not handling the object correctly. Oils on the handler’s hands can be transferred onto the objects. Contamination can also occur as a result of secondary processes being performed on the parts. For instance, if you choose to wash the objects with a detergent, this may leave a residue behind on the object and the ink may not adhere properly. Here at EPS we use alcohol. This is a standard solution which readily flashes off and is used to wipe the parts of any dust, oils or any contaminants before printing. With proper handling, cleaning the parts may be unnecessary, but wiping with alcohol does assure that there will be a clean surface to print on.

    Blooming is a term used in the plastic industry and it denotes a plasticizer or other additive coming to the surface of a part over time. The difficulty with this contamination is that you can wipe the surface of the part free of contaminates but over time the part will re-bloom and the contaminants will interfere with the bond between the ink and the parts.

    Mold release agents (also known as de-molding agent, form oil, parting agent or release) are substances used in molding and casting that aid in the separation of a mold from the material being molded and reduce imperfections in the surface. While these additives make the plastic manufacturing process simpler, they can wreak havoc on attempts to achieve adhesion.

    In the end, experience is the best weapon in attaining adhesion. If you have any questions or concerns please contact Technical Service.  For more information about Engineered Printing Solutions’ custom solutions, standard pad printers, industrial digital ink jet, consumables and other auxiliary equipment, email sales@epsvt.com or call 1-800-272-7764.

  2. Ink Adhesion Part 2: Bi Component, Pre-Treatment and Post Cure

    Comments Off on Ink Adhesion Part 2: Bi Component, Pre-Treatment and Post Cure

    Have you ever looked on the back of an object and seen the recycle symbol? It tells you what material the object is made of. When it comes to plastics, Polypropylene and Polyethylene are considered the two of the most difficult materials to get ink to adhere to due to their relatively low surface energy. Polypropylene is used to make a wide variety of items and low and high density Polyethylene is commonly used in food packaging. When it comes to these difficult substrates it becomes necessary to pre-treat to affect a change in surface energy to make the surface amenable to bonding with – or cross-linking – with the ink.  This causes the substrate surface to become more receptive.

    The most commonly used methods of pre-treatment are:

    • Plasma and Corona: Electricity applied to the surface.
    • Flamer: Liquid propane (LP) or natural gas. With Flamer there may be variation due to cleanliness of the burn and how the flame will pre-treat any given substrate.
    • Chemical Pre-Treatment: Usually manually applied with a liquid soaked rag.

    Unfortunately on any given substrate you cannot assume that you will affect an equivalent change in the surface energy from one pre-treatment to another. Finding the correct ink pre-treatment may consist of 3 different segments: cleaning, activation and surface bonding.

    Plasma surface treatment is a process that raises the surface energy of various materials in order to improve the bonding characteristics when ink is applied. Plasma is used widely in the medical industry. This is because you don’t have the bi-product of the other 2 pre-treatments such as carbon from the flaming process or residual VOC’s left behind from the from the flashing process of a chemical pre-treatment. Corona treatment is commonly used on materials such as polymers, papers, films, glass and metals.

    Plasma is a good option for components that require a longer treatment hold. Some of the key advantages include: surface chemistry and 3 dimensional treatments. Corona is another form of plasma that can be used with in-line processes. When working with corona the systems are easy to maintain and user friendly.

    Flame pre-treatment can also be integrated into inline processes, and require careful and sometimes precise setup in order to be safe and effective. Proper air to gas ratios, flame intensity and dwell time all play into successful pre-treating. Flame plasma systems combine compressed air and a flammable gas which is combusted to create a flame. One advantage is that the material surface only has to be exposed to the flame for a brief period of time to become polarized through oxidation. One setback is the heat level required for this treatment may cause damage to the parts.

    Chemical priming is yet another way to pre-treat difficult to adhere to substrates and is generally considered a last resort due to the generally manual nature of application. Essentially primers are used to chemically modify the surface by removing contaminants, adding reactive sites for bonding and increasing surface energy. One disadvantage is that these primers often contain chlorinated solvents that are considered volatile organic contents.

    Many substrates will require pre-treatment to satisfy customer’s individual requirements for print longevity. But with the correct treatment and testing, our technical service technicians will test the inks and provide samples for the individual customer’s review.

    For information about Engineered Printing Solutions’  custom solutions, standard pad printers, industrial digital ink jet, consumables and other auxiliary equipment, visit Ink Adhesion Part 3: Ink Mixing, Contamination, Blooming and Mold Release Agents, email sales@epsvt.com or call
    1-800-272-7764.

  3. Ink Adhesion Part 1: General Education

    Comments Off on Ink Adhesion Part 1: General Education

    Have you ever looked down at a water bottle and wondered how the logo got there? Personally I know I have. Before the colors and image can get put together on the object the first question that needs to be answered is how to choose the right ink for the job. Simply put, ink adhesion is ink that sticks to any given product to a known specification. One of the most common tasks our Technical Service team are charged with is to “find me an ink that sticks to the surface of my product.” It wouldn’t be realistic if I told you that our Technical Service team has magic powers and can automatically determine the perfect ink for the material being printed on. Even though inks are produced to stick to a particular substrate; the question is which ink is best suited to adhere to your particular substrate based on your requirements?

    There are many different substrates and even more sub-sets within each . Not all polypropylene’s (PP), for example, are created equal. An ink that may exhibit flawless adhesion to one PP product may not adhere at all to another. We therefore need to match the ink series with the particular substrate being presented. However if you supply our Technical Service team with the parts you wish to print on, they will be able to begin working their “magic”. They will be able to first make an educated guess as to which ink will meet the customers’ expectations based on experience, then begin testing the inks and provide samples for the individual customer’s review.

    For information about Pad Print Machinery of Vermont’s custom solutions, standard pad printers, industrial digital ink jet, consumables and other auxiliary equipment, visit Engineered Printing Solutions, email sales@www.epsvt.com or call 1-800-272-7764.

  4. Pad Printing in Multiples

    Comments Off on Pad Printing in Multiples

    Compared to the world of manual pad printing, the world of automation is virtually unlimited, within reason. Here at Engineered Printing Solutions we have taken a standard KP05 bench mounted printer and stripped it of the software and hardware. We then completely customized it to be able to produce 8,000 pieces per hour, all the while requiring minimal operator involvement.  How do you decide if automation is right for you? Well you need to ask yourself 3 questions: How many pieces per hour do you need to print? How many colors on the image? Finally what is the size of the image? With this machine, it all starts with the Bowl Feeder which aligns the parts all the same direction and feeds them down a track to the printer, printing the parts and finishing with the items going out under an infrared heater, ensuring that the images are dry enough to continue down the production line to other operations or to packaging. However with every innovation there are obstacles which we must work through.

    YouTube player

    Some of the technical problems that can arise are:

    • Being able to efficiently feed the parts to keep up with the printer.
    • Printing multiple images in one pad stroke can create some undesirable results. This may require custom pads.
    • Being able to efficiently process parts through the system without damaging even the most delicate part.
    • Ensuring that the printed image is dry enough to withstand downstream operations as soon as it leaves the system.

    In this case we are printing 8 pieces at a time so our engineers need to make sure that the images are being placed correctly on each of the 8 parts every time.

    For information about Engineered Printing Solutions custom solutions, standard pad printers, industrial digital ink jet, consumables and other auxiliary equipment, visit Ink Adhesion Part 3: Ink Mixing, Contamination, Blooming and Mold Release Agents, email sales@www.epsvt.com or call 1-800-272-7764

  5. Pick This and Place First in Pad Print Success!

    Comments Off on Pick This and Place First in Pad Print Success!

    The pad printing industry has revolutionized marking in so many manufacturing industries, and continues to grow and cause further change. Pad Print Machinery of Vermont wants our customers to stay current on what has — and still is — happening in your industry and in the fields your customers service.

    Starting today we will occasionally feature new equipment, or additional devices available for that equipment, that have made a difference in your competitors’ businesses. You might want to consider investing in some of these in the near future.

    Consider a pick and place device

    The single most cost-effective automation feature for customers servicing any industry is a pick and place device, used to rake off or auto-unload parts after printing. Adding this one feature can come close to doubling your production rate overnight. The best news? It increases production at a low cost and saves operator time. The operator no longer has to load the parts onto the machine and then unload them onto a table or elliptical conveyor. The operator simply loads them.

    Here’s the technical stuff

    Pick & Place Systems are pneumatic or servo-motorized devices which can be installed on the pad print machine’s conveyor or other automation devices. Click here to see a video on different Pick & Place applications.

    A pick-and-place device can be designed for 2, 3, 4 or more axes/stations, depending on the conveyor installed and the configuration of the pad print machine. It is ready to install on conveyors for automatic loading and/or unloading of parts.

    PPMOVT has conveyors available ranging from the Linear Shuttle for single-part fixtures (offering four stations for four-color and six stations for five-color printing), up to top-of-the-line conveyors offering fully-automated, servo motor-driven, multicolor system up to 48+ stations.

    Our reps should know!

    The experienced PPMOVT customer service reps know about great deals like this. Increased production, moderate startup costs, a big boost on your ROI — these are benefits your business can’t ignore.

    Remember: we want your business to grow with your equipment. PPMOVT has reps assigned to your area waiting to hear from you. Call us at 1-800-272-7764, or use Live Chat on our Home page https://www.epsvt.com

    A year from now, call us to report a 100% increase in production year-to-date. We’ll celebrate with you!

  6. Reasons to Consider a Servo-Driven Pad Printer

    Comments Off on Reasons to Consider a Servo-Driven Pad Printer

    While a programmable servo-driven pad printer will cost more than comparable electro-pneumatic models, they provide the highest degree of accuracy, control, adaptability and flexibility in a more compact area, and they include additional valuable features.

    The improved servo-driven technology allows engineers to choose linear motion devices that:

    • provide the highest degree of accuracy
    • increase speeds while maintaining quality
    • reach the required torque in a given application
    • save and store programs for convenience and accuracy on future print runs
    • pick up and print an image wherever it needs to be and assure that the user produces more impressions with less waste and fewer errors in less time. That’s a win-win.

    In the most sophisticated printers, the horizontal print head movement can be controlled and programmed at each of the two functions — ink pick-up from the cliché and print position on systems featuring independent pad actuators. You can also repeat or change the control values for each plate stage/print station, a major improvement that provides individual adjustment in a multicolor system with hair-splitting accuracy and repeatability.

    Couple this with the ability to provide independent pad vertical movement using linear actuators that work independently. This eliminates pad interference when printing oversize parts, offering the convenience of using different pad shapes and heights at every position in a system. Are you starting to see what this can do for the future of your business yet?

    Are you sure it will help me?

    At PPMOVT, we carefully evaluate each application to engineer the best and most cost effective solution with the end user in mind. We execute them flawlessly on our own manufacturing floor. After all, when all is said and done, it is the printing system’s performance, reliability and user friendliness that really counts.

    The same servo-driven actuators described above are also used on Pick-and-Place automation devices that provide part loading/unloading to/from holding fixtures, part conveyance and other movement accessories, with total precision even when variable speeds are required throughout the motion. Automatic pad changing can be included to allow the use of multiple pads in a selected routine. That’s technology. That’s what Pad Print Machinery of Vermont can do for you.

    What do I do next?

    Call us in for an analysis. That’s fun for us. We won’t sell you something that doesn’t make you better and stronger. Program in Pad Print at 1-800-272-7764, or use Live Chat on our Home page  https://www.epsvt.com
    Please make sure the coffee’s hot!

  7. The Skinny on Plate Types

    Comments Off on The Skinny on Plate Types

    Engineered Printing Solutions reps often hear the question “what plate type should I use?” The answer is standard for pad printing:

    • What is the intended application
    • How detailed is the artwork (fine lines? large solid areas?)
    • What are the environment’s conditions (dusty? flying debris?)
    • What is the thickness or opacity of ink required?
    • What is the size of the run?

    Your rep is here to help you analyze your job and narrow your choices, including plate type. There are two major image plate types:  Steel and Photopolymer. Let’s take a closer look at each.

    Steel Plates

    • Thick Steel Plates. These are old-fashioned and originally used in pad printing because it was usually the only choice. There were few to no other more affordable materials. These thick steel plates were tempered and machined flat prior to acid etching. Very expensive and requiring an outside plate-maker service, their redeeming quality was longevity, often providing several-hundred-thousand print cycles.
    • Thin Steel Plates. These plates have gained in popularity due to the improved materials used. They provide excellent flatness for proper functionality and higher tempering (into the Rockwell 70’s) for long life. Their cost is much lower than thick steel plates and can be used on the same standard plate stages as polymer plates. These plates also need an outside plate-maker service – acid bath required.

    Photopolymer Plates
    Photopolymer plates come in a variety of types and are made of photosensitive material that changes chemical composition when exposed to ultraviolet light. Using a film positive, the image is etched into the plate, preventing the image area from being exposed to the UV-light. To control etch depth in larger color areas, a second exposure with a screen is necessary.

    • Double Exposure. These plates are available in several polymer materials depending on the etch depth and the number of impressions needed. An exposure unit is required to expose the plate and would require using a line screen. This material is available in either alcohol- or water-based development. A full list of plate materials can be found on our website – Printing Plates here.
    • Single Exposure. This special material provides a very thin photopolymer coating, clad to a very thin steel backing. The plate can only be etched to a .001” depth and requires a single exposure. This material has a shorter impression life than conventional Double Exposure plates. Since it lacks the customary screen in the artwork area, it is used only on fine line or text artwork. It is not used to print bold artwork or solid backgrounds.
    • Laser Etched. These plates are used in conjunction with a laser etching device such as our RapidFire Laser Etcher to produce plates similar to the conventional Double Exposure plates, including screened artwork areas of all types. Bringing this ability in-house eliminates the need for artwork films and provides multiple benefits in speed, turnaround, corrections and profitability.

    Where do I get help?
    Recommendations, troubleshooting and assistance in all areas of your production cycle are at the end of your phone or mouse! Call the trained and experienced Pad Print people at 1-800-272-7764, or use Live Chat on our Home page  https://www.epsvt.com
    We’ll stop by for a cup of coffee!

  8. Pad Printing Tips: Production Speed

    Comments Off on Pad Printing Tips: Production Speed

    You’re not ready to invest in faster equipment yet. Still, you wish you could increase your number of imprints by end of day. A simple way for pad printers to increase their production speed, which in turn increases print volume, is to change your operating speed.

    Here’s one way  how:

    Maximizing Speed Means Minimizing Strokes

    1. Minimize your stroke by increasing the base height of the pad so the pickup stroke on the cliché starts from about 10mm or less above the cliché.

    2. Then bring the part fixture as close to the pad surface as possible to minimize the print stroke as well.

    3. Make sure that the end-of-cylinder stroke dampeners are open enough to do some cushion work, but not so much that they slow down the stroke of the cylinder.

    This concept applies to all pad printers. The closer the pad begins from the surface of the substrate, the faster they will connect and move on.

    Keep Your Part-Loading Area Clear

    Try to design your tooling so that the part being printed is slid into a cavity, thus preventing the pad on the print side from causing a loading obstruction. PPMOVT has machines where this is not an issue. The clichés move back and forth and the pad, in its stopped position, is back away from the print surface.

    Follow these tips and you’ll find your business with extra product by day’s end.