Comments Off on Tech Tip Tuesday: Tools Required To Operate Pad Printing Machines
[vc_row][vc_column][vc_column_text]In the traditional sense there are very few tools required to operate pad printing machines. In most cases you will find that a single M4 Allen key will be all that you put to the machine in order to get it setup and functioning.
However there are a few tools outside of formed metal that come in much more handy. Common sense, diligence and a little elbow grease. If the former two attributes are employed, from day one, the latter decreases exponentially as do the issues that impose themselves when allowing the process and machine to get a bit messy.
For instance, one of the leading causes of premature wear of Printing Plates is dried ink between the mount surface of the cliché and the cliché support. Simply wiping both surfaces prior to setup contributes greatly to maximizing the production life of the cliché. When ink infiltrates the surface between the two mating parts, the inkcup tends to work at what becomes a raised portion of the cliché. You will find that a divot will develop as the inkcup shaves away, ever so slightly, the material. The next time the cliché is used, the divot that has developed will catch ink. If near on in the image area the cliché will be rendered useless.
Tip number one imparted during all training sessions is to keep the process and equipment as clean as is feasible. Excess ink will seep into places that may seem innocuous at the time but down the road, after the ink has had a chance to dry and cure, it will act as an adhesive and beget many a cuss word as screws are stripped and adjustments made impossible due to parts sticking together.
Cleanliness makes for a happy process!
Want to learn more about pad printing? Contact our Sales Team:
Heads up! Saving your progress now will store a copy of your entry on this server and the site owner may have access to it. For security reasons, file uploads will have to be re-entered when you resume.
Comments Off on Ink Adhesion Part 3: Ink Mixing, Contamination, Blooming and Mold Release Agents
Before printing on any parts there are several factors which are of vital importance: ink mixing, product cleanliness and substrate additives. Regardless of proper ink preparation and chemistry, surface contamination, blooming and mold release agents may all interfere with your ability to achieve satisfactory adhesion.
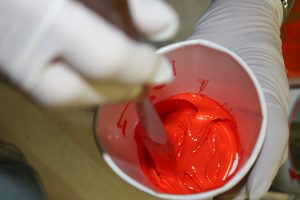
The two most important factors that must be addressed when dealing with ink mixing are: How are you mixing the ink? What components are you using? Inks are formulated to be mixed at specific ratios, and any deviation may result in adhesion failure. You must choose the correct ink and mix it to the exact manufacturer specifications. It is a common misconception that adding hardener over manufacturing specifications will allow for better adhesion.
Surface contamination is a huge factor in whether or not the ink will adhere to any given object. The first reason contamination may occur is because people are not handling the object correctly. Oils on the handler’s hands can be transferred onto the objects. Contamination can also occur as a result of secondary processes being performed on the parts. For instance, if you choose to wash the objects with a detergent, this may leave a residue behind on the object and the ink may not adhere properly. Here at EPS we use alcohol. This is a standard solution which readily flashes off and is used to wipe the parts of any dust, oils or any contaminants before printing. With proper handling, cleaning the parts may be unnecessary, but wiping with alcohol does assure that there will be a clean surface to print on.
Blooming is a term used in the plastic industry and it denotes a plasticizer or other additive coming to the surface of a part over time. The difficulty with this contamination is that you can wipe the surface of the part free of contaminates but over time the part will re-bloom and the contaminants will interfere with the bond between the ink and the parts.
Mold release agents (also known as de-molding agent, form oil, parting agent or release) are substances used in molding and casting that aid in the separation of a mold from the material being molded and reduce imperfections in the surface. While these additives make the plastic manufacturing process simpler, they can wreak havoc on attempts to achieve adhesion.
Comments Off on Ink Adhesion Part 2: Bi Component, Pre-Treatment and Post Cure
Have you ever looked on the back of an object and seen the recycle symbol? It tells you what material the object is made of. When it comes to plastics, Polypropylene and Polyethylene are considered the two of the most difficult materials to get ink to adhere to due to their relatively low surface energy. Polypropylene is used to make a wide variety of items and low and high density Polyethylene is commonly used in food packaging. When it comes to these difficult substrates it becomes necessary to pre-treat to affect a change in surface energy to make the surface amenable to bonding with – or cross-linking – with the ink. This causes the substrate surface to become more receptive.
The most commonly used methods of pre-treatment are:
Plasma and Corona: Electricity applied to the surface.
Flamer: Liquid propane (LP) or natural gas. With Flamer there may be variation due to cleanliness of the burn and how the flame will pre-treat any given substrate.
Chemical Pre-Treatment: Usually manually applied with a liquid soaked rag.
Unfortunately on any given substrate you cannot assume that you will affect an equivalent change in the surface energy from one pre-treatment to another. Finding the correct ink pre-treatment may consist of 3 different segments: cleaning, activation and surface bonding.
Plasma surface treatment is a process that raises the surface energy of various materials in order to improve the bonding characteristics when ink is applied. Plasma is used widely in the medical industry. This is because you don’t have the bi-product of the other 2 pre-treatments such as carbon from the flaming process or residual VOC’s left behind from the from the flashing process of a chemical pre-treatment. Corona treatment is commonly used on materials such as polymers, papers, films, glass and metals.
Plasma is a good option for components that require a longer treatment hold. Some of the key advantages include: surface chemistry and 3 dimensional treatments. Corona is another form of plasma that can be used with in-line processes. When working with corona the systems are easy to maintain and user friendly.
Flame pre-treatment can also be integrated into inline processes, and require careful and sometimes precise setup in order to be safe and effective. Proper air to gas ratios, flame intensity and dwell time all play into successful pre-treating. Flame plasma systems combine compressed air and a flammable gas which is combusted to create a flame. One advantage is that the material surface only has to be exposed to the flame for a brief period of time to become polarized through oxidation. One setback is the heat level required for this treatment may cause damage to the parts.
Chemical priming is yet another way to pre-treat difficult to adhere to substrates and is generally considered a last resort due to the generally manual nature of application. Essentially primers are used to chemically modify the surface by removing contaminants, adding reactive sites for bonding and increasing surface energy. One disadvantage is that these primers often contain chlorinated solvents that are considered volatile organic contents.
Many substrates will require pre-treatment to satisfy customer’s individual requirements for print longevity. But with the correct treatment and testing, our technical service technicians will test the inks and provide samples for the individual customer’s review.
Compared to the world of manual pad printing, the world of automation is virtually unlimited, within reason. Here at Engineered Printing Solutionswe have taken a standard KP05 bench mounted printer and stripped it of the software and hardware. We then completely customized it to be able to produce 8,000 pieces per hour, all the while requiring minimal operator involvement. How do you decide if automation is right for you? Well you need to ask yourself 3 questions: How many pieces per hour do you need to print? How many colors on the image? Finally what is the size of the image? With this machine, it all starts with the Bowl Feeder which aligns the parts all the same direction and feeds them down a track to the printer, printing the parts and finishing with the items going out under an infrared heater, ensuring that the images are dry enough to continue down the production line to other operations or to packaging. However with every innovation there are obstacles which we must work through.
Some of the technical problems that can arise are:
Being able to efficiently feed the parts to keep up with the printer.
Printing multiple images in one pad stroke can create some undesirable results. This may require custom pads.
Being able to efficiently process parts through the system without damaging even the most delicate part.
Ensuring that the printed image is dry enough to withstand downstream operations as soon as it leaves the system.
In this case we are printing 8 pieces at a time so our engineers need to make sure that the images are being placed correctly on each of the 8 parts every time.
Comments Off on Inkjets: How Do I Choose the Right Inkjet Printer?
That’s the million dollar question! (Don’t worry. It won’t cost that much.) We’ve already outlined how you might benefit from the addition of an inkjet printer, and how to justify the cost of another piece of equipment, in a previous post. Now you have to match your workload and job requirements to the right machine configuration.
What’s the best inkjet machine solution?
That depends. Here are a few criteria used to get that answer:
Image quality – higher resolution means higher priced heads (or more passes).
Throughput – there are “multi-pass” versus “single-pass” options (more on that later).
Part size – limitations on height / width = machine size.
Image size = part size = machine size.
Substrate used – Regardless of the print technology, some substrates (PP & PE come to mind) still require pre-treatment for best image adhesion.
Number of colors required – dark substrates will need White base-coat layer, plus CMYK
What’s the best inkjet technology for me?
Do you need high volume / throughput with minimal part handling? Consider an automated conveyor, single-pass inkjet printer. You’ll typically get:
A print width that will be a minimum of 2.75″ and can be wider on a custom configuration.
Print resolutions up to 720 dpi in a single pass.
This is a great configuration for in-line applications, especially when pre-treatment is required. In many applications, you might require tooling of some sort to make sure parts are spaced and aligned consistently. Some units will incorporate a series of sensors to detect the part, and software that tells the heads when the part is in position for printing. We’ll help you with those.
Do you need higher resolution (up to 1200 dpi) but less speed? Perhaps a flatbed printer is your best option. These units offer:
An advantage for smaller / identical parts that can be placed in machined trays or nests.
A vacuum platen so you can print flat “stock.”
A series of print heads (arrays) on a rack that moves across the bed, printing and curing as it goes, giving you the capability of printing in a single direction, or printing in both directions, depending on your needs. It’s not as fast, but print resolution may be a higher priority.
With either of the above technologies, you will have the capability of adjusting print speeds, ink density / droplet size, head heights, and color hues. Speaking of colors, if you are printing process color on a dark substrate, you will need to print a white base layer first, but both technologies can accommodate that. In addition, it’s possible to print a clear-coat to protect the image or provide a more glossy appearance, but you’ll probably have to sacrifice one of the white arrays.
Do you only print in one color? Obviously, it’s possible to print monochrome or spot colors with inkjet, but keep in mind that it’s not practical to change or flush colors in the same array. With most high end industrial inkjets, ink is fed from bulk tanks, not cartridges (helps to keep the consumable costs down).
Therefore, if you are thinking of printing with one color only, monochrome machines are available, but you need to be very sure that you will only require that one color. Custom machines have been built with white and black arrays, so the customer can print either (and even mix both to get a gray hue).
Does your customer ask to make changes on press or repeat exact specs? Inkjet will usually provide the capability to manipulate the images at the machine, with the assistance of on-board graphic art software such as Adobe Illustrator or CorelDRAW. Some machines are capable of storing jobs (or job “queues”) so operators can simply select from a drop-down box. Custom machines are network-capable, so jobs can be entered remotely, and many in-line / automated units can be accessed remotely for both job entry and diagnostic capabilities.
Now you know a lot more about inkjets than the average pad printer. Don’t forget: at EPS we build your inkjet the same way we build your pad printer — from the ground up to your specifications. That makes it clean, efficient and engineered for accuracy and cost effectiveness.
Call our toll-free number 800-272-7764 or fill out the form below. We’ll start you down a two-lane inkjet/pad printer highway to greater success.
Heads up! Saving your progress now will store a copy of your entry on this server and the site owner may have access to it. For security reasons, file uploads will have to be re-entered when you resume.
Comments Off on Ergonomics in the Printing Environment
Here’s a quick study on ergonomics.
Simply put, ergonomics is defined as the science of work. The word is derived from two Greek words: ergon, meaning work, and nomoi, meaning natural laws. So it is really the science of work and a human relationship to that work; a “discipline focused on making products and tasks comfortable and efficient for the user” (from about.com).
We call it workplace and equipment design that maximizes productivity and minimizes operator fatigue, discomfort and repetition. There are even some laws on the book protecting employees from poor ergonomic process.
Are pad or inkjet print ergonomics different?
It could be as simple as moving supplies to a more accessible location. Or create a staging area close by the pad or inkjet printer with a rolling table. It could be as amazing as adding automation to your existing machine, like a conveyor or pick-and-place robotic arm.
You can check your work environment yourself, or call us to do it for you. It benefits your employees, your business and your bottom line! When PPMoV analyzes your ergonomic setup, we evaluate the following three major components of ergonomics:
1 The Workplace: Design: Is there maximum throughput at the printer, and efficient flow-through of parts throughout the process (e.g., from mold to assembly and/or packaging)? Setup: Have you allowed an adequate staging area for both blank (unprinted) parts, and efficient “take-away” of the treated parts to the conveyor/oven/next work cell? Environment: Have you provided “operator-centric” lighting, ventilation, and proximity to the ink mix/cleanup area? Did you set up a “process-centric” stable environmental condition (for ink management)?
2 The Operator: Intervention: Did you minimize movement distances for both manual and continuous cycles? Can you save time & steps by replacing manual pad cleaning with automatic pad cleaning at each print station? Efficiency: Should you adjust machine height to accommodate all operators? Remember: users’ heights vary! Can you assure that machine dimensions safely accommodate maximum part size and weight? Would you like us to suggest tooling designs that are “easy in, easy out?” Should you measure potential safety issues like “pinch points,” noise levels, etc.?
3 The Equipment: Engineered to task: Can you minimize setups and/or changeovers (e.g., are you using a one-color machine for two-color jobs)? Can you minimize part handling from load, to pre- treat (when required), to print station(s), to unload?
Become a Case Study
After our evaluation, we talk to you. We listen to what your goals are, what bothers you, where you see your business heading. Can you become a success case study?
Read this Power Tools. It’s about automation, but their employees needed ergonomic help as well.
I don’t know where to start?
It starts with a phone call. Engineered Printing Solutions is a different printing equipment manufacturer – we don’t sell the same machine to everyone; we build it just for you. We want your equipment to grow with your business. Your work is specialized, flexible and expanding; your equipment should be too. EPS has reps assigned to your area waiting to hear from you. Call us at 1-800-272-7764, or use the form below.
Heads up! Saving your progress now will store a copy of your entry on this server and the site owner may have access to it. For security reasons, file uploads will have to be re-entered when you resume.
 Before printing on any parts there are several factors which are of vital importance: ink mixing, product cleanliness and substrate additives. Regardless of proper ink preparation and chemistry, surface contamination, blooming and mold release agents may all interfere with your ability to achieve satisfactory adhesion.