EPS is now the exclusive North American distributor for the Xaar Versatex Printbar

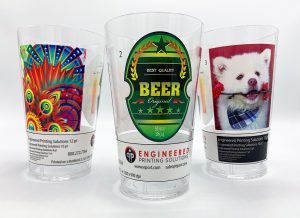
Pad printing’s a great way to transfer images to 3-dimensional parts. Its versatility handling shapes and substrates composition surpass almost every other automated marking method. However, getting that ink to ADHERE to all these parts can present a challenge, especially parts molded from Polyethylene (PE) or Polypropylene (PP).

These two substrates exhibit a low surface energy (usually measured and described as the “Dyne level”). There are other substrates like those possibly containing Teflon that are also problematic. But PE and PP are so widely used in different industries, we’ll stick (no pun intended) with them for the purposes of this discussion.

Most ink manufacturers provide inks that are “suitable” for PE and/or PP. In many cases you’d just treat it like any other pad printing job with no issues. However, depending on the customer’s expectations of image durability, this may not prove a viable option. It is, however, the first place to look.

Pre-treating for adhesion choices

There are four choices when faced with adhesion issues:

  • Special ink
  • Chemical wipe
  • Flame treatment
  • Corona discharge

Pre-wiping parts by hand with a chemical that allows the ink to bond is a “second-tier” option, best suited to prototypes and short runs. Many firms hesitate to introduce another chemical into their work flow, and you’ll be exposing operators while increasing run time as well.

For longer runs and constant production speeds, you really have to look at the final two options – flame or corona – usually in a print cell, or actually integrated either into the machine configuration or in-line.

Flame treatment is more cost-effective, easily integrated and in some cases, actually provides a better surface pre-treatment. However, some firms choose not to have an “open flame” in their workplace, regardless of the fact that most flamers are heavily guarded and the actual flame is no more than 1” to 2” in length.

Electrical discharge units (some call it corona while others refer to a plasma-jet) are just that: an electrical charge across or through the substrate that raises the energy level to a point where ink will cross-link and adhere. These are more costly to purchase, but better suited to some substrates.

Please note that there’s no “magic bullet” when it comes to pre-treatment technologies. Some work better with substrate “A” versus substrate “B.” To complicate matters even further, there are a large number of different blends of plastics, especially PE and PP, while other plastics may include recycled (“re-grind”) material; flame-retardant additives; colors, etc., all of which can affect adhesion characteristics.

To conclude: your choice is based on throughput speeds and budget, plus environmental issues.

Your ink or machine supplier will be able to assist you with testing and choices, as you need to find out what works best, will meet your production rates, and is most cost-effective.

One final note: If you are importing molded parts, be aware that the “blend” of materials may change without notice; what works this month may not work in the future. New batches may require new research. If you can, check with your parts manufacturer and bring that information back to your ink supplier.

Join the conversation! We have technical ink experts available to answer your questions and work through any problems you may encounter. Confused? Connect with the right person to help. We make the complicated seem easy!

Pad printing is a thin film process. It starts with an etch depth in the cliché of approx. 25-75 microns and only a fraction of that ink film is picked up by the pad. Of the wet ink, 50% is a solvent that evaporates leaving only a 5 micron dry ink deposit. You can easily see why such a thin ink film is so susceptible to changing temperatures, humidity levels, static charges and even variations in airflow. Listed below are the ways you can control the ink viscosity and seasonal adjustments.

Control the rate that solvents evaporate from the ink
• Solvents evaporate too slowly
– The surface of the ink may not be tacky enough to pick up or release images from the pad
• Solvents evaporate too quickly
– Ink might not pick up from the cliché because it has dried in the etched portion of the plate, or dried on the pad in transit to it’s destination.

Same for the pad
• Solvents evaporate too slowly
– Only some of the ink will release from the pad to the substrate
• Solvents evaporate too quickly
– Ink dries and stays on pad.

Tips
• Warm environments: Add solvents every 20 – 30 minutes. Always add a measured amount, use a viscospatula and don’t guess!
• Control temperatures: Keep printer out of the sun, away from drafty entrances, exits, dryers.
Keep the temperature of the substrate to room temperature.
Don’t let printed part drop below 59°F until fully cured – 4 days or longer.
• Good housekeeping: Dust and vacuum floors instead of sweeping. Avoid cardboard boxes in production area. Wipe down all surfaces using a damp cloth.
Static electricity feathers the print. Slow the down stroke and pickup.
• Too hot: Solvents in the ink will evaporate very quickly. Solvents are attracted to water vapor molecules in the air.
– Speed up the forward travel of the pad stroke.
– Thinner / retarder mix (75% Thinner to 25% Retarder)
• Too cold: Solvents won’t evaporate quickly enough. Ink won’t be tacky enough between pickup and and lay down to transfer completely to the substrate.
– Slow down the forward travel of the pad stroke
– Select a faster drying thinner
– Use a hair dryer pointed at the pad as it travels forward after ink pickup to speed up the evaporation of the solvent
– Raise ambient temperature.

Custom decorators and product marking professionals have some common challenges, and one of them is print run consistency. Getting their ink to perform in the same way with the same quality from job to job, regardless of who is mixing the ink, has a better chance of success with some controls in place.

Ink series’ colors and batches can vary. Heat, cold and humidity can make inks thicker or thinner (their viscosity) from one run to the next. Viscosity affects the quality of the print job through ink absorption, color strength and evaporation/drying.

  • Thick, high-viscosity inks are tacky and impede image transfer.
  • Thin, low-viscosity inks run loosely to their own determined borders, changing halftone dot dimensions and blurring the image.

Although it is difficult to control variables such as atmospheric conditions, plastics decorators typically change machine settings or use additives to overcome these challenges when they occur. For experienced ink technicians, trial-and-error troubleshooting is second nature for correcting ink adhesion. For others, following ink manufacturer’s instructions and written notes — in conjunction with the PPMOVT Viscospatula — take the guesswork out of mixing ink and achieving consistently satisfactory results.

The Viscospatula is a simple, efficient tool used to achieve consistent and accurate ink viscosity when mixing pad printing inks. This tool has precision-milled holes and slots cut into a special ink-shedding fiberglass compound. When dipped into a prepared mixture, the ink flows down the spatula from the first hole to the fifth at a measurable rate, allowing adjustments to the ink’s thickness. The rule of thumb is: the thinner the ink, the faster it moves from the first hole to the last hole.

Using this tool to measure viscosity on a properly performing ink and noting the results with the job’s ink mix provides a roadmap toward future mixing success. Click Uneven ink thickness to see the Viscospatula and read more about it. We hope you never again have to explain why a reprint looks different from the original.

Join the conversation!  Do you have a process to ensure reprint consistency?  What tools do you use? Our technical ink experts are available to answer your questions and assist you in achieving ink nirvana. We answer any pad printing question!

In the most recent SGIA Journal, Julian Joffe, CEO of Engineered Printing Solutions, was asked to participate in the article on “Compact UV-LED Flatbeds Take Inkjet Printing to New Heights” by freelance writer Eileen Fritsch.

Last October the fJET-24 flatbed printer was added to our inkjet product line. This printer supports single- or bi-directional CMYK printing and is excellent for personalized souvenirs, customized gifts, industrial products and special promotional items.

Adding the fJET-24 capabilities in any print shop would be a good way for a print-service provider to diversify their business. This unit is designed as a “high-speed Industrial flatbed” printer and offers high-quality graphics on most flat surfaces.  It allows the production of any image directly from standard graphic files to the product with no need for intermediate steps. It effectively replaces screen printing or pad printing and allows technically-proficient wide-format printers to break into new markets without the introduction of new, unfamiliar types of printing processes.

Three major advantages:

  1. Allows direct production from a graphic file to print with no need for clichés or pads. Plus, multicolor imaging is accomplished without the need for image registration between colors. Extremely simple CYMK set-ups, compared to CYMK printing in the pad printing world – not that easy to do – where creating separations can be … well, challenging. The fJET-24 is equipped with an internal RIP that allows almost instantaneous creation of a separation file that is then sent directly to the printer in seconds.
  2. Reduction in set-up costs that enable CYMK printing with no additional set-up charges needed.
  3. Large image areas can easily be printed – up to 20″ x 24″ – in either CYMK multicolor or spot colors.

Reduction in set-up time and elimination of components such as plates and pads translates into a cheaper printing. Inkjet has many advantages, but it will not replace pad printing, which is a better solution for products with curved and recessed surfaces.

Join the conversation! Thinking about adding a flatbed inkjet printer to your production mix? Have questions about inkjet printers? Concerned about UV-LED ink adhesion? Get our attention with a comment, phone call or Live Chat online.

Size minimizes distortion
Pad for a Pad Printing Machine
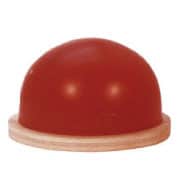
An important variable to consider in quality pad printing is the pad size, especially as it relates to the image size. In pad printing, the larger the pad size used, the less the image is likely to distort in the printing process.

  • Pad size is measured in length, width and height without the base.
  • As a general rule, your pad should measure 10% to 20% larger than the image’s length and width.
  • Remember the “throat” – or the distance between the cliché and the body of the machine – often determines the maximum pad size you can use.


Special pad printing pads for large images
In some situations, a large image area must be printed and the machine does not have the power to compress such a heavy pad in a smooth motion.

Cylindrical pad for Pad Printing Machines
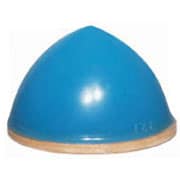
Two solutions to this problem are available:

  • The first is to use a pad with a hollow interior that provides the same surface hardness. The hollow interior also reduces the cost of silicone rubber used in a large pad.
  • The second option is a dual-hardness pad, where the core of the pad is made of a softer material and the outer layer is the harder rubber. Either method helps, but using dual-hardness allows for a more stable pad.
  • Of course a third option would be to use a different imaging process like screen printing.
  • There’s another unusual pad configuration that is like an inflated pig bladder. Specialized machines use hollow pads inflated with air just prior to ink pick-up. The pad stays inflated until it comes into contact with the substrate. Then the air is released. The deflated pad can conform to a wider area of the substrate, printing up to 180 degrees compared to 100 degrees with a standard pad on a cylinder or sphere.

Join the Conversation! Have you had problems with print distortion or image size? Click Cylindrical Printing Pads or call us at 800-272-7764 for our suggestions on pad size usage. We love your challenges!

All Fired Up: Pad Printing Glassware

These cups were printed on the BottleJet 2.1 Cylindrical inkjet Printer.

Most glassware has some kind of discernible shape. Logically, pad printing emerges as a natural choice in glass decorating and printing. The more complex the shape, the more suitable pad printing becomes as a decorating process.

With the right tooling, multicolor prints, special-effects inks, and even 360 degree wrap-of-image-around-circumference are possible. Automated parts-handling options can further speed production rates.

There are two primary inks used in pad printing glassware: frit inks and acrylic inks.

Acrylic inks
Acrylic inks are mixed with a catalyst hardener as well as with a solvent thinner, which allows the ‘tack-up’ and transfer from cliché to pad to part. A post-print bake is usually recommended (3-5 minutes at about 200 degrees F) to improve the durability of the print. The bi-component ink mixture typically has a ‘pot life’ of 6-8 hours, after which time the ink hardens on its own, rendering it unusable for any further printing.

Acrylic inks are fairly durable, providing at least 50 wash cycles in your average home dishwasher.

Frit inks
For greater durability, a frit ink is the way to go.

Frit inks contain:

  1. Finely ground glass particles in the ink mixture (very small, only a few microns in size)
  2. A pigment (the colorant)
  3. A binder, which is a carrier used to keep the ingredients in suspension
  4. A thinner, the solvent which facilitates the silicone pad transfer process.

Different frit suppliers recommend different combinations of the above four components. There are no pot life issues to consider when using frit inks.

After printing with the frit ink, the printed ware is fired in a kiln, typically at about 1100 degrees F on average for up to 30 minutes. The ground-glass particles come very close to their melt point; the organic ingredients in the print burn off, and a physical bond is created between the print and the product. Frit inks are generally considered the most durable of all glassware prints, capable of lasting a lifetime and providing tremendous abrasion resistance.

Have you had glassware decorating challenges? Feel free to contact us for advice on the best options for all types of pad printing on glassware.

Fields marked with an asterisk are required.
This will enable us to direct your inquiry to the appropriate Sales Engineer.
Click or drag files to this area to upload.You can upload up to 3 files.
Upload an image file (optional)
Note: Under no circumstances will we sell, share or otherwise distribute your data outside EPS.

Albert F. Shore developed the measurement device called a durometer in the 1920s to measure material hardness. As a result of the Shore ratings, the terms hardness and durometer became interchangeable. Many pad print pad manufacturers color code the standard durometers by adding pigment to the silicone itself or by coloring the pad base. The following chart shows the durometer range for each silcone material (color) we typically recommend:

Color                             Hardness
Blue                                  10 – 60
White                               20 – 65
Red                                   30 – 75

The harder the pad, the higher the Shore durometer rating. Three basic pad durometers are standard in the industry and cover most applications. Custom pad durometers are also available through most pad suppliers. We suggest you invest in a durometer gauge, valuable for all pad printers for determining pad hardness and quality control of pads in rotation. This simple tool is available through silicone-rubber suppliers and many general-service dealers in the screen printing and pad printing industries.

Choosing the proper pad hardness for a job is often a combination of experimentation and experience. As a general rule, the harder the pad, the better the performance, the longer the pad life. But hard pads may be impractical in some applications. Here are some guidelines for durometer selection and maintenance:

  • Use softer pads when printing on heavily contoured surfaces or on fragile items.
  • Use a softer pad if the power of your machine can’t compress the pad sufficiently to achieve a satisfactory rolling action.
  • Use hard pads for textured surfaces, or printing an image in a recessed area where the pad must roll over a “step”.
  • Use hard pads in a pad “nest” where a number of pads are spaced with small gaps (for example, printing computer keyboards).
  • Consider a special pad for printing on abrasive substrates and textured finishes. Example applications include automobile control arms like turn-signals and windshield-wipers, when the pad must resist the abrasive nature of the substrate.
  • Avoid using pads of different durometers on the same application. The thickness of the ink deposit will vary on the substrate.

Custom Pads – Custom Service
Confused about durometer? Need help selecting pad durometer for a custom job? We have a full pad department to help and we don’t charge for phone calls! Click Cylindrical Printing Padsor call 800-272-7764 for our undivided attention. We are here to help you!

Recently it came to my attention that not all of my customers are aware of some hidden expenses.

For example, the cliché size vs. your business expenses is directly analogous with an electric/hybrid vehicle vs. a gas guzzler’s effect on gas costs. The hybrid costs more up front but the gas guzzler costs more at the pump.

I was visiting a customer in Miami a couple of weeks back and we walked over to a bunch of inexpensive-looking pad printing machines with 90mm cups. The client asked me to quote clichés for these machines. Their business uses about 6,000 clichés per year and the cliché size for these machines is 100x300mm. This is a full 100mm longer then the clichés our “expensive” “hybrid” pad printer uses.

The cost differential on the larger clichés: a full 30% more (in dollar terms about $1.80 more per cliché) than the smaller 100x200mm. This translates into about $10,800 cost per year more for their clichés  than for our machine!

“Why is the cliché on your machine only 200mm long while these are 300mm long?” asked the client.

“The answer is simple,” I replied. “Our machine uses a separate pad drive and cliché drive, while this manufacturer uses only one drive for both the pad and cup. When you use a single drive, the cup and the pad bars are connected together. To reach a comfortable distance that allows a decent part size to fit in front of the machine, the stroke on the cliché has to be the same as the stroke on the pad. So the cliché also is longer to accommodate the longer stroke. My friend, the machine is cheaper but the plates are making you ‘drive to the gas station’ more frequently.”

Sometimes we think that because a machine or product is cheaper we are saving money. But this example is evidence to the contrary.

Lesson: Shop well and buy from a company  you can trust.

This customer is now replacing all these machines with a more expensive – but better quality – machine that will cost less to operate and rescue his bottom line in the long run.

Our pad department asked me to investigate why a long-time customer had stopped buying our pads. The idea crossed my mind that our pad department was questioning the quality of our pads compared to an unknown competitor’s. So, since I had been planning a trip that included this particular customer, I confirmed a meeting with them.

After our initial welcome, we sat down to talk. I asked them bluntly why they had started using another supplier for their pads without discussing their issues with us first. The customer became defensive, insisting they had not stopped ordering from us. They then brought me on a tour of the production area, where I saw the rows of machines we had supplied some years earlier, all working beautifully – with our pads.

The real shocker was their final disclosure: they were getting about 250,000 cycles plus per pad because they had adopted our recommended method of pad rotation. Based upon the number of machines in operation, we calculated they had saved about $12,000 per year over the past 2 years because of the way in which they cared for their pads.

I thought that I was going into this meeting to battle for this customer’s pad business. I had prepared a strategy of careful analysis and special pricing. I walked away feeling a bit silly when I realized they could have paid a lot more for our pads than we were charging and still remained a loyal customer. But I was happy that we were saving our customer money by selling a superior product and giving away solid, money-saving advice for free. We were heroes.

This true fairy tale ends with “and they all lived happily ever after,” because this particular customer was smart enough to listen to and implement our suggestions. Please understand that these same pads can also wear out after 50,000 imprints, and pad life is very dependent on ink type, substrate and maintenance. 

For additional information, see our previous blog Pad 101. If you’re not getting individualized attention from your supplier, call us. We even customize our service!

Choosing the right print pad for a pad printing job is not an easy decision. Five key pad characteristics (shape, durometer, size, surface finish and material) affect the quality of the printed image. But shape is the most important variable in selecting a pad, so let’s discuss why in today’s blog.

The Different Pad Shapes
Pad suppliers offer many pad shapes in their standard inventory, but most are based on three basic shapes:

  • Cylindrical
  • Rectangular
  • Linear

Although hundreds of pad shapes are available, most are based on these three shapes.

Each of these shapes could have either curved or flat printing surfaces, depending on the part to be printed. But regardless of what shape the pad has, it must “roll” onto both the cliché and substrate for good printing results. If at all possible, avoid flat-bottomed pads that have a tendency to trap air as it contacts the cliché.

Air trapped between the pad and the cliché, or between the pad and the substrate, can cause print distortion and pin-holes, a result of uneven ink pickup or imprint. To produce a quality print image, the pad surface must roll onto the cliché picking up the ink, and use the same rolling action depositing the ink onto the image area. The better the roll, the more ink that is transferred. The shape of the pad largely determines how well the pad will roll. This is what makes shape the most important variable in selecting a pad.

Ordering Custom Pads
For very unusual parts and imaging needs, sometimes custom pads are a good choice, combining two different profiles on one pad. They are expensive and must be carefully designed and tested to avoid print distortion. For more information, Cylindrical Printing Padshere or call 800-272-7764 to discuss if this is a viable choice for you.